Showing posts with label learning. Show all posts

Friday, 17 May 2013

Working with the Owl...Ahem...more or less

Ok, so I got inspired (and a touch over-excited) by the new-to-me artist Rebecca Latham, and decided to try out the "miniature" technique on my owl.  It just so happens I have quite the stock of illustration board in my studio (yay) so nothing stands in my way :)

First of all, I'd have to prepare my illustration board.  It comes in these huge 20xsomething sheets, and I figured I'd cut out some 5x7 cards to work with.  I knew I'd definitely want one to test techniques on, and at least one other for the owl itself.


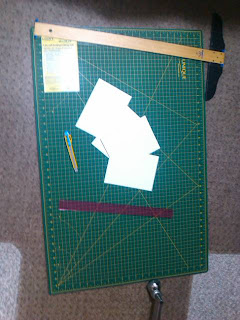
I got out my handy-dandy (and also new to me) t-square, and my large cutting matt, and measured out 7".  I used my exacto knife to cut the board lightly and repeatedly until the piece came free.  I then cut the 7" strip into 5" pieces.


Sorry about it being sideways - can't seem to remember how to fix it at the mo.  Okay, so now that I had my materials, it was time to figure out how I was going to transfer the drawing.  The first thing I thought of was my handy-dandy light table (i.e. window), but illustration board is waaayyyy to thick for light to go through.  My second thought was to use my projector.  It's exactly perfect for this sort of thing and I hardly ever get to use it!  Perfect!

Turns out, not so perfect.  The image I want to do is smaller than 5x7.  The projector REALLY doesn't want to go to that size.  I can do 8x10, but not smaller without the image being so out of focus as to be not useable.  Okay, okay, I give up.  Guess we go back to the tried-and-true method of tracing paper.

So I took my image to the my light table (read "window"), taped it on, taped a piece of tracing paper over top and started tracing. (yay).


I honestly don't care for the tracing step.  It's very tedious and boring (compared to creating the image) and then of course I will have to do it again to get it onto the illustration board (yay).  Also my image wasn't dark enough in many places to see through the tracing paper, so I had to stop at least once, to go over my drawing to darken the lines (grrr).

Well, now that the tracing (part 1) is done, I can go ahead and test the illustration board for painting techniques.  I have only used illustration board one other time to do an image of lillies on an inked black background.  It was done mostly with dry washes, so I hadn't really gotten a chance to see what the board could take (compared to watercolour paper).

I found out some interesting things in testing out the board. 1) I really should stand when I paint - I get a much better feel for the brush and things don't look quite so amateur (even though that is what I am). 2) illustration board dries MUCH faster than paper - even when you load it with water! 3) the board takes a lot more water than you'd expect.  I tried to use as much as when I did the crocus painting, but it was difficult to measure because the brushes were so small. 4) the board takes a lot of water and doesn't buckle or warp the way paper does.  It acts more like stretched paper, but I've even had that buckle on me.  5) acrylic brushes really must be used when applying pigment to a wet area.  I was testing with natural hair brushes, and they kept lifting pigment, or water, or even losing hairs (grrr). 6) dry-brushing fur is not as easy as it looks.  Here are my testing efforts:


I really looked like I knew what I was doing up till this didn't I?  Okay so there's a lot of learning curve here.  I think I will persevere with this one though.  I want to try the tests out again, applying what I learned and see if I can do better.  If not - back to basics we go!


Friday, 19 April 2013

Much better painting attempt!

Today I was determined to retry the succulent painting.  I did a few things differently.  After setting up my painting area, the first thing I did was push my chair WAYYY back.  I  didn't want to even be tempted to sit.  I have learned from past experience that standing is one of the best ways to work wet-in-wet.  You get better arm movement and you can more easily see how the water is drying and what the painting needs.

The second thing I did was draw out the image.  After that I planned out my paint colours.  I prepared some in my palette and painted onto a scrap piece of paper.  I wrote down the colours I used to make them too.  This way I not only know how to mix them again, I also know how well the colours look on the paper.  And when I need to make more I have something to compare to so I will know how close to the original colour I am.


Then I started painting the first leaf/petal.  I continued working until I got tired, moving from wet leaf/petal to dry leaf/petal, making sure that the next petal I worked on was surrounded by dry petals.  As I moved along I definitely noticed improvement from one petal to the next.  You can see I have an unintentional blossom in the one petal at top-right - another lesson learned.  And there were a few places were the paper was dryer than I thought when I added more colour.


I think there's a definite improvement from my last attempt though.  The colours are richer and there's more dimension in the leaves.  It gets a bit difficult because I don't really know where her light source is, but I found that by slowing down and really thinking about what I want to happen and what needs to be done I had better results.  When I got panicky or rushed things went badly.

I'm going to let it dry for now and maybe work some more on the weekend to finish the leaves/petals, then I will let it dry before I add the shadows with dry brush glazing.  I'm nervous about this because I'm afraid to lift the underlying colour in my attempt to lay on a new layer.  Well...I guess that's what practice is all about :)

Wednesday, 17 April 2013

Bad painting...bad, bad painting!

Today I decided to follow along with Birgit O'Connor in one of her workshop videos.  She works wet-in-wet with large shapes and sweeping brush motions.  I thought things were going pretty well with her initial exercise to show how much water to use and ways to get the colours to blend on the paper.  I think mine turned out pretty well, with only a few backwash issues (the colours running between rectangles was done intentionally).


Then I thought I'd press on to her next demonstration - a succulent.  It all seemed simple enough, just follow the same steps as in the rectangles.  Of course it would help if I had the same colour palette, but I was not to be deterred by something so small - I improvised and did the best with what I had.  On the first petal I knew I had a problem.  Watching Birgit do it, with her broad sweeping strokes and ability to get the exact shape on the paper with her brush in one stroke, I thought it would be simple.  Turns out there's more to brush handling than I anticipated.

Now, I have painted before and it's turned out decently enough.  I guess I've always known my brush stroke could use some work, but now I REALLY know it!!  Anyway...here's my finished piece.  It's decent enough I suppose for a beginner.  Definitely could use some work.


Here's what Birgit did:

Let's face it, mine just doesn't compare at this stage :P

It's a good thing that I'm not overly self-critical, or I might just want to chuck all my painting gear and hide under my blankets until the world once again becomes a nicer place (I struggled with that thought for a long while).  I think I will try this demonstration again.  I got the impression that I was starting to get an idea of things at the beginning and the end, but in the middle everything went (to give it a Pratchett reference), "banana-shaped".  Ah well, there's nothing like dogged perseverance to learn a new skill!  And now that I know what not to do, the next time should go better, right? 

Monday, 8 April 2013

Making a maquette with clay

Had a pretty good weekend, the weather was lovely and I got a rare opportunity to give myself a much needed mani-pedi, no polish this time though.  And was thinking about this skull.


I'm having issue with the back of the skull.  Something about it just doesn't look right.  The face is going well, but it looks like a completely separate piece, not a complete skull.  So, I thought I would try the maquette again.  But because the playdough worked so well last time, this time I went to the local dollar store (Yay Dollarama!!) and bought myself some clay.


And it's GLUTEN FREE!  This really wasn't an issue since I wasn't intending to eat it, and really, why would clay have flour in it anyway?!


I also bought some clay modelling tools ($5 - Michael's - cheaper at Curry's but a MUCH longer drive).  I referenced how to make a skull out of clay - thank you Google, and started work this morning.  As it turns out, I have absolutely NO skill in working with clay.  I thought this would be as simple as playdough, but clay is a much more resistant material.  Don't get me wrong, that's exactly what I wanted, but it tended to dry out much more quickly than I expected.  The tools were awesome though.  I could get the detail and definition I wanted (with my limited skills) with moderately little effort, getting into crevices my fingers couldn't reach.  Here's the result so far.


Looks creepy don't he?!  You can see the partial drawing in the background - I obviously have a LOT of work still to do, but I'm beginning to see what may be going on in the drawing already.

After working with it for about an hour or so I decided it was time to put it away.  It was getting drier by the minute and harder to work with.  I figured I didn't want it to dry completely since I want to come back to it later, so I thought I'd try the old trick of a damp paper towel in a ziplock bag to keep it moist.  We'll see how that works out.


I needed a break, so refreshed with some juice and cleaned my desk of clay.  I pulled out the crocuses again to continue the line drawing (no pic today) for the remainder of the day.

Here are the links I used for how to make a skull out of clay:
If anyone has any tips on how to work with clay or how to make a skull out of clay, I'd be really interested to hear them!