Showing posts with label owl. Show all posts

Thursday, 13 June 2013

Brenda Hoddinott is awesome!

I spent some more time online looking for "how to draw an owl" this time.  Some amusing finds, but eventually I came across a site called www.drawspace.com.  It offers free and membership lessons (I believe there's a certificate option as well) and is primarily run by Brenda Hoddinott.  She's a self taught Canadian artist from the East Coast and wrote 2 books (I have both): Drawing for Dummies, and The Complete Idiot's Guide to Drawing People.  Both can be purchased at Amazon or Chapters.

Brenda is an excellent drawing teacher, and uses some pretty cool techniques like "squirkling"!  Anyway, on this site there was a free pdf lesson on how to draw one of her owls she calls Hooter.  Of course I took this opportunity and printed myself a copy.

It's pretty well detailed with step-by-step instructions on drawing this very cute owl, though I'm not sure what type of owl he's supposed to be.

I decided that since I didn't want to draw just any owl, but a Great Horned owl, that I would modify her steps a little and modify my model a little to create a new image (yes, I have a knack to do things the hard way).


The only flaw with her lesson is that I think we might be using different brands of pencils.  The HB she uses to get such nice dark shadows is a bit too light for me.  Otherwise I think this is coming along well.

It was nice to get some drawing in again.  Lately I've been feeling like all I do is read and research!!  I can't wait to see how this will turn out.  I'm hoping that after I've drawn him, that I will be able to maintain my enthusiasm and interest long enough to paint him.

Thursday, 30 May 2013

Painting an Owl Part I

I finally started to paint the owl today.  It wasn't too hard to start as I had already chosen my colours and transferred the image to watercolour paper.  Because I wanted to work wet-in-wet, I had to decide how best to cover the image.  I could have wet the whole page and then applied pigment as needed, but I decided to work in sections instead.

First, I wet the top of the head and ear tufts.  Then, following the original image (roughly) I applied pigment.  When the paper was just started to loose its sheen (indicating a level of dryness), I added some water drops for texture at the middle top of the head.


I wanted to keep the outside edges soft and the colours to blend just a little to show softness.  I kept the eye area white for now as there are lighter feathers around the eyes.  I also covered some of the feathers under the beak.  Then I worked on the body as a section, wetting the area and applying pigment as appropriate.


This is my first wash.  I think he looks a bit like Wolverine at the moment, but there's definitely an impression of softness about him.  I will work on the face next time and then put in the rest of the head. It will be a while before I get to work on the details and shading.  But as a first step I think this has gone well.


Monday, 27 May 2013

Progress to paint an Owl

Had a lovely weekend with the family celebrating my hubby's birthday.  It was a kind of R&R away from art work and a much needed step away so I could step back.

As I said in my last post, I am done with miniatures for now.  I enjoyed the seeping movement and relative freedom that came from working on a larger scale.  So, I decided to blow up the owl.  No not literally (shame on you for thinking that)!  I pulled out my handy-dandy tracer enlarger and scaled up the owl to fill an 8x10 (quarter) sheet of watercolour paper.  I only put in his head and eyes, and a bit of the chest.  Then I traced him out.  For a change, this didn't take as long as I had feared and so wasn't too tedious.  I went over the whole image with my kneaded eraser to dull the pencil lines down.  If you don't do this the lines may show through the painting and you are less able to lift them out after you apply paint over them.


If I've done it well, you shouldn't be able to see much in this pic.  I only want the lines to be there as a guide, not a rule.  I'm planning to work wet-in-wet to achieve a look of soft feathers and maybe some motion (wind ruffling or something).  I want to work in a way similar to how I did the crocus, but I'm not sure which part to tackle first.  In the crocus it is easy to section the painting into "pieces" as each petal can be done individually.  But in the owl I'm not seeing an easy way to section it.  I think I may just work in colour stages and keep an eye on what brushes I use instead.

If I work in layers and keep to the synthetic brushes for the successive layers and keep a light hand so I don't accidentally lift underlying layers...I think that might just work.

I also sat down and planned out my colours for the painting.


In my planning I tried to lay down not just the colour, but application as well.  So in the colours I plan to use on the feathers, I've tried out a bit of fading technique to see how well the colour will stand up to that too.

Next time - painting begins!


Monday, 20 May 2013

Gosh it's hot outside!

Victoria Day in Ontario turned out to be sunny and ridiculously warm (28C)!  First time in several years that this has ever happened - it usually snows :P  It was great weather for gardening and setting up the kiddie pool!

But I digress.  Back to what I should be talking about - painting the owl.  Just for interests sake, I took another look at the illustration board I painted on Friday and I noticed a distinct warpage of the board.


On the left is the board I painted on, on the right, a fresh board.  You can see the edges have turned up a bit on the painted board.  I don't particularly think this will be a problem, I just wanted to mention that it happened.


So, in continuing with the owl, I took the copy from the tracing I did last time and coated the back with some charcoal sticks I happened to have.  This will give a nice transfer to the new surface.


Then I did my least favourite thing and traced the owl (again) onto the illustration board.  Then, because the charcoal was very dark, but also very loose, I used my drafting brush to sweep the excess off the board (we meet again zombie owl).


Now, because I'm anal (and partly because I'm nervous to start painting the owl and have thought up a conveniently practical avoidance tactic), I thought I should repeat the painting exercise I did last time, but hopefully with better results.  I chose a picture of one of our lovely tulips blooming in the front garden.  This time I used a combo of natural and synthetic bristle brushes.  


I've only just started it, but as you can see I've already had some difficulty with the veining.  Ah well.  My objective isn't to get perfect accuracy for this exercise, so much as seeing just how well I can paint on so small an area, and see how illustration board will take this very wet technique.  I will continue to work on the tulip before I do anything further on the owl I think.  I don't want to rush things unduly and hate what comes out :)

Friday, 17 May 2013

Working with the Owl...Ahem...more or less

Ok, so I got inspired (and a touch over-excited) by the new-to-me artist Rebecca Latham, and decided to try out the "miniature" technique on my owl.  It just so happens I have quite the stock of illustration board in my studio (yay) so nothing stands in my way :)

First of all, I'd have to prepare my illustration board.  It comes in these huge 20xsomething sheets, and I figured I'd cut out some 5x7 cards to work with.  I knew I'd definitely want one to test techniques on, and at least one other for the owl itself.


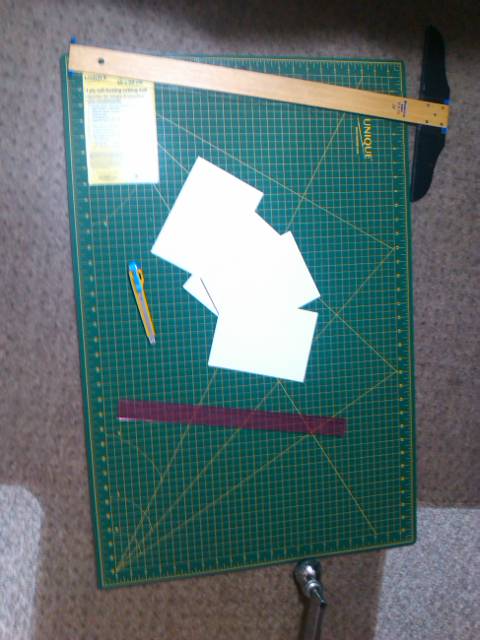
I got out my handy-dandy (and also new to me) t-square, and my large cutting matt, and measured out 7".  I used my exacto knife to cut the board lightly and repeatedly until the piece came free.  I then cut the 7" strip into 5" pieces.


Sorry about it being sideways - can't seem to remember how to fix it at the mo.  Okay, so now that I had my materials, it was time to figure out how I was going to transfer the drawing.  The first thing I thought of was my handy-dandy light table (i.e. window), but illustration board is waaayyyy to thick for light to go through.  My second thought was to use my projector.  It's exactly perfect for this sort of thing and I hardly ever get to use it!  Perfect!

Turns out, not so perfect.  The image I want to do is smaller than 5x7.  The projector REALLY doesn't want to go to that size.  I can do 8x10, but not smaller without the image being so out of focus as to be not useable.  Okay, okay, I give up.  Guess we go back to the tried-and-true method of tracing paper.

So I took my image to the my light table (read "window"), taped it on, taped a piece of tracing paper over top and started tracing. (yay).


I honestly don't care for the tracing step.  It's very tedious and boring (compared to creating the image) and then of course I will have to do it again to get it onto the illustration board (yay).  Also my image wasn't dark enough in many places to see through the tracing paper, so I had to stop at least once, to go over my drawing to darken the lines (grrr).

Well, now that the tracing (part 1) is done, I can go ahead and test the illustration board for painting techniques.  I have only used illustration board one other time to do an image of lillies on an inked black background.  It was done mostly with dry washes, so I hadn't really gotten a chance to see what the board could take (compared to watercolour paper).

I found out some interesting things in testing out the board. 1) I really should stand when I paint - I get a much better feel for the brush and things don't look quite so amateur (even though that is what I am). 2) illustration board dries MUCH faster than paper - even when you load it with water! 3) the board takes a lot more water than you'd expect.  I tried to use as much as when I did the crocus painting, but it was difficult to measure because the brushes were so small. 4) the board takes a lot of water and doesn't buckle or warp the way paper does.  It acts more like stretched paper, but I've even had that buckle on me.  5) acrylic brushes really must be used when applying pigment to a wet area.  I was testing with natural hair brushes, and they kept lifting pigment, or water, or even losing hairs (grrr). 6) dry-brushing fur is not as easy as it looks.  Here are my testing efforts:


I really looked like I knew what I was doing up till this didn't I?  Okay so there's a lot of learning curve here.  I think I will persevere with this one though.  I want to try the tests out again, applying what I learned and see if I can do better.  If not - back to basics we go!


Monday, 13 May 2013

Thank you Lee Hammond

Came away from this weekend feeling pretty good.  One would almost go as far as saying I felt "up".  We hung a bunch of artwork from our respective families (finally), and, for those of you that heard I was putting the crocus painting in a drawer - have no fear, my husband took a noticeable stand against that.  He insisted I find a frame, and it too is now up in my living room.  It will only stay up until I finish my next exercise and then we will "rotate" the images :)

So...this leads me nicely to my newest work in progress, the owl.  I took the image I found off the net and did some computer work to it.  Mostly removing the background and making the image gray scale. Then I started following Lee Hammond's advice (How to draw pet portraits from photographs) and got out my 1x1 inch grid.

My grid is on a plastic sleeve/page cover so I can see clearly through it and I can also re-use it!  Then I drew another grid on my paper (also 1x1, mostly because I didn't feel the need to enlarge it).  Following the gridlines, I drew the owl.


He's not perfect.  There's absolutely NO shading at this point (okay I did put some in the pupils - it was too creepy to look at zombie owl!).  My purpose was to do a line drawing, outlining the features and dark areas, to get a better grasp on the subject.  Now I get to do the fun part!  What do I want to do with this owl?  Do I just want a portrait like this?  Maybe just the head and neck? Maybe add some conifer branches behind his head?  What about a moon?  Where's the light coming from?  Do I want to change the direction of the eyes (where he's looking)?  Almost anything is possible at this point!  So next I get to do a bunch of thumbnail sketches to decide what I want to do with this guy.


Friday, 10 May 2013

At Last!!

Finally!  I actually finished the crocus painting.  And I don't care for it.  Don't get me wrong, lots of things worked out really well.  But the pistils got funny at the end.  I don't like the "fuzziness" of the pistils.  There's no definition in them.  I blame this on the fact that I used a photograph and not a real flower as a model.  This would mean that I couldn't intimately understand how the pistils were shaped and that ignorance translated into the image.  I also don't like the "graininess" of the colour in the pistils.  Not sure what that's all about...but whatever.  It was an awesome exercise and I'm glad I did it!  I will likely try it again soon with summer on its' way and SOOOO many flowers to draw/paint! :)


Another thing I learned in this project was how to re-flatten the paper.  When you paint with water, the paper gets all bumpy and curled (if you don't stretch it, which I didn't, as per Birgit's instructions).  Fortunately, Birgit also showed how to flatten the painting by wetting the back and letting it smooth itself out.  What I learned was - don't let the water get to the painting side of the paper!  I watched her do it and it seemed simple enough, but when I did it and flipped the painting over I noticed that not only were there places where the water seemed to have gotten to the paint (i.e. water drops), but the excess water on the back seeped to the front (naturally) and wet the paint.  Go figure.  I mopped up the damage as best I could, but on the whole I consider this a success.  I've never done any of that before and now I know what NOT to do!!

So after doing so very little painting today, I decided it was time to put the paints away for a while.  I was VERY excited over the success of the crocus and I admit that I was getting over-ambitious considering my skills.  My thoughts were moving toward much more difficult pieces and it took a while to realize that I wasn't ready for those just yet.  Thankfully my daughter being ill helped me step away and more carefully consider my situation here.

Now I am back to the owl piece I want to do.  Unfortunately I've had absolutely no luck finding the pictures I took, so I broke down and searched the web for a likely model.  I found a few images of Great Horned Owls.  They have awesome faces!  I plan to carefully draw one out to figure out how to render feathers, etc, and also how I want to present an owl in a finished piece.  I like owls.  I don't get to interact with them ever.  But I like the way they look and what they represent as a symbol.  I think they could be a lot of fun to study.  I'm looking forward to this project!  Here's my first rough sketch: