Thursday, 30 May 2013

Painting an Owl Part I

I finally started to paint the owl today.  It wasn't too hard to start as I had already chosen my colours and transferred the image to watercolour paper.  Because I wanted to work wet-in-wet, I had to decide how best to cover the image.  I could have wet the whole page and then applied pigment as needed, but I decided to work in sections instead.

First, I wet the top of the head and ear tufts.  Then, following the original image (roughly) I applied pigment.  When the paper was just started to loose its sheen (indicating a level of dryness), I added some water drops for texture at the middle top of the head.


I wanted to keep the outside edges soft and the colours to blend just a little to show softness.  I kept the eye area white for now as there are lighter feathers around the eyes.  I also covered some of the feathers under the beak.  Then I worked on the body as a section, wetting the area and applying pigment as appropriate.


This is my first wash.  I think he looks a bit like Wolverine at the moment, but there's definitely an impression of softness about him.  I will work on the face next time and then put in the rest of the head. It will be a while before I get to work on the details and shading.  But as a first step I think this has gone well.


Monday, 27 May 2013

Progress to paint an Owl

Had a lovely weekend with the family celebrating my hubby's birthday.  It was a kind of R&R away from art work and a much needed step away so I could step back.

As I said in my last post, I am done with miniatures for now.  I enjoyed the seeping movement and relative freedom that came from working on a larger scale.  So, I decided to blow up the owl.  No not literally (shame on you for thinking that)!  I pulled out my handy-dandy tracer enlarger and scaled up the owl to fill an 8x10 (quarter) sheet of watercolour paper.  I only put in his head and eyes, and a bit of the chest.  Then I traced him out.  For a change, this didn't take as long as I had feared and so wasn't too tedious.  I went over the whole image with my kneaded eraser to dull the pencil lines down.  If you don't do this the lines may show through the painting and you are less able to lift them out after you apply paint over them.


If I've done it well, you shouldn't be able to see much in this pic.  I only want the lines to be there as a guide, not a rule.  I'm planning to work wet-in-wet to achieve a look of soft feathers and maybe some motion (wind ruffling or something).  I want to work in a way similar to how I did the crocus, but I'm not sure which part to tackle first.  In the crocus it is easy to section the painting into "pieces" as each petal can be done individually.  But in the owl I'm not seeing an easy way to section it.  I think I may just work in colour stages and keep an eye on what brushes I use instead.

If I work in layers and keep to the synthetic brushes for the successive layers and keep a light hand so I don't accidentally lift underlying layers...I think that might just work.

I also sat down and planned out my colours for the painting.


In my planning I tried to lay down not just the colour, but application as well.  So in the colours I plan to use on the feathers, I've tried out a bit of fading technique to see how well the colour will stand up to that too.

Next time - painting begins!


Friday, 24 May 2013

Lazy Day

I've spent the last 24 hours planning how the owl will go, and I think I have a good start.  Unfortunately I woke up this morning feeling the worse for wear and decided to not tackle that particular beast today. Instead I took the morning refreshing myself and recharging my batteries.  If I have any time this weekend I will at least try to get the tracing onto watercolour paper done, and perhaps even a quick sketch of my plan so I don't forget it for Monday.

I don't know about you, but I don't think I take enough days for myself.  Sometimes the energy to push myself into my studio makes the process less fun and more of a stress than I like.  Sure I'd like to go professional one day, but that day isn't today and while daily exercise is important to develop and grow your skills, it's also important to not push developing skills so hard that they break.  I don't want to ever hate painting and drawing.  I want the exact opposite - to love it so much that it carries over into what I do to the point that people see it when they look at it and want to take that energy into their homes for themselves.

Lazy days are just as important for development as productive days - so long as they are few and far between :)

Wednesday, 22 May 2013

Mini tulip

Today was not the success I had hoped for.  I admit to having some pretty high expectations on the outcome of my tulip, but these did not pan out today.  I think part of my difficulty was in my mindset before I went into the studio.  My mind was drifting continuously over all the things I wanted to do today, plus the excitement of the art job at hand, plus the weather was overcast and rainy which made me feel slow and dull.

So with my distracted and poorly focused mind, I went into my studio intending to produce a glorious painting.  Right...  Well it began well.  I worked on the remaining 3 petals though you'll notice that the colouration isn't what it could be.  The veining did not improve.  I also started on the stem.


And then for some obscure reason, I decided that I wasn't being heavy handed enough with the colour, especially in the middle of the flower which needed to be darker.  I admit, it wasn't a good thought.  I added to the middle, then started working on the background.  I thought I'd try for a wet-in-wet blurry idea of more tulips and leaves and stems in the background.  I don't think it worked the way I had intended.

They say that every painting goes through an "ugly" stage.  I'm really hoping that we have reached that stage in this painting.  I'm going to put this away for now and come back to it at a later date.  It may still be possible to bring this painting around, but in my present frame of mind...I just don't think so.

I've decided I don't much care for working on such a small scale.  It's too easy to make mistakes, and the mistakes you make show up that much more.  I may come back to the "miniature" approach after I have better mastered painting in general.  For now I think this will be my last mini painting for a long while.  I am going to prep paper and review the video to paint the owl.  It's unlikely I will get to start painting next time as preparation could take some time (argh! more tracing!!), but we'll see how things go.


Monday, 20 May 2013

Gosh it's hot outside!

Victoria Day in Ontario turned out to be sunny and ridiculously warm (28C)!  First time in several years that this has ever happened - it usually snows :P  It was great weather for gardening and setting up the kiddie pool!

But I digress.  Back to what I should be talking about - painting the owl.  Just for interests sake, I took another look at the illustration board I painted on Friday and I noticed a distinct warpage of the board.


On the left is the board I painted on, on the right, a fresh board.  You can see the edges have turned up a bit on the painted board.  I don't particularly think this will be a problem, I just wanted to mention that it happened.


So, in continuing with the owl, I took the copy from the tracing I did last time and coated the back with some charcoal sticks I happened to have.  This will give a nice transfer to the new surface.


Then I did my least favourite thing and traced the owl (again) onto the illustration board.  Then, because the charcoal was very dark, but also very loose, I used my drafting brush to sweep the excess off the board (we meet again zombie owl).


Now, because I'm anal (and partly because I'm nervous to start painting the owl and have thought up a conveniently practical avoidance tactic), I thought I should repeat the painting exercise I did last time, but hopefully with better results.  I chose a picture of one of our lovely tulips blooming in the front garden.  This time I used a combo of natural and synthetic bristle brushes.  


I've only just started it, but as you can see I've already had some difficulty with the veining.  Ah well.  My objective isn't to get perfect accuracy for this exercise, so much as seeing just how well I can paint on so small an area, and see how illustration board will take this very wet technique.  I will continue to work on the tulip before I do anything further on the owl I think.  I don't want to rush things unduly and hate what comes out :)

Friday, 17 May 2013

Working with the Owl...Ahem...more or less

Ok, so I got inspired (and a touch over-excited) by the new-to-me artist Rebecca Latham, and decided to try out the "miniature" technique on my owl.  It just so happens I have quite the stock of illustration board in my studio (yay) so nothing stands in my way :)

First of all, I'd have to prepare my illustration board.  It comes in these huge 20xsomething sheets, and I figured I'd cut out some 5x7 cards to work with.  I knew I'd definitely want one to test techniques on, and at least one other for the owl itself.


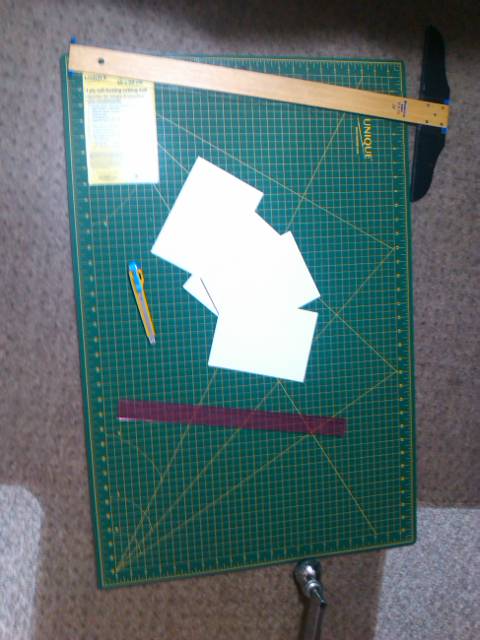
I got out my handy-dandy (and also new to me) t-square, and my large cutting matt, and measured out 7".  I used my exacto knife to cut the board lightly and repeatedly until the piece came free.  I then cut the 7" strip into 5" pieces.


Sorry about it being sideways - can't seem to remember how to fix it at the mo.  Okay, so now that I had my materials, it was time to figure out how I was going to transfer the drawing.  The first thing I thought of was my handy-dandy light table (i.e. window), but illustration board is waaayyyy to thick for light to go through.  My second thought was to use my projector.  It's exactly perfect for this sort of thing and I hardly ever get to use it!  Perfect!

Turns out, not so perfect.  The image I want to do is smaller than 5x7.  The projector REALLY doesn't want to go to that size.  I can do 8x10, but not smaller without the image being so out of focus as to be not useable.  Okay, okay, I give up.  Guess we go back to the tried-and-true method of tracing paper.

So I took my image to the my light table (read "window"), taped it on, taped a piece of tracing paper over top and started tracing. (yay).


I honestly don't care for the tracing step.  It's very tedious and boring (compared to creating the image) and then of course I will have to do it again to get it onto the illustration board (yay).  Also my image wasn't dark enough in many places to see through the tracing paper, so I had to stop at least once, to go over my drawing to darken the lines (grrr).

Well, now that the tracing (part 1) is done, I can go ahead and test the illustration board for painting techniques.  I have only used illustration board one other time to do an image of lillies on an inked black background.  It was done mostly with dry washes, so I hadn't really gotten a chance to see what the board could take (compared to watercolour paper).

I found out some interesting things in testing out the board. 1) I really should stand when I paint - I get a much better feel for the brush and things don't look quite so amateur (even though that is what I am). 2) illustration board dries MUCH faster than paper - even when you load it with water! 3) the board takes a lot more water than you'd expect.  I tried to use as much as when I did the crocus painting, but it was difficult to measure because the brushes were so small. 4) the board takes a lot of water and doesn't buckle or warp the way paper does.  It acts more like stretched paper, but I've even had that buckle on me.  5) acrylic brushes really must be used when applying pigment to a wet area.  I was testing with natural hair brushes, and they kept lifting pigment, or water, or even losing hairs (grrr). 6) dry-brushing fur is not as easy as it looks.  Here are my testing efforts:


I really looked like I knew what I was doing up till this didn't I?  Okay so there's a lot of learning curve here.  I think I will persevere with this one though.  I want to try the tests out again, applying what I learned and see if I can do better.  If not - back to basics we go!


Wednesday, 15 May 2013

A New Artist - A New Influence

Okay, I know you were expecting some information on the thumbnail sketches I promised last time.  I did get some work done in that way.  I still haven't decided what to do with the owl, but in searching the internet for inspiration, I came across a new artist (to me anyway) that I have absolutely fallen in love with!

Now, obviously when I say I've "fallen in love with her", I mean her work - it's fabulous!  She's a watercolorist too and she works in what she calls "miniature painting".  I looked into it further and she doesn't paint small images, the term "miniature" refers to the detail in her paintings.

Her name is Rebecca Latham and here is her site:

http://lathamstudios.com/rebecca

She works with her family as well.  Her paintings are extraordinary!  I may just try to follow in her example - I didn't even know you could go to that level of detail in watercolour.  I am very excited  about how this will influence my own work.